Applicant Tracking System (ATS)
Greenhouse Integration Setup
The Reimbi-Greenhouse integration allows candidate data to be sent from Greenhouse to Reimbi resulting in the candidate record being created in Reimbi. Upon receiving the required information via the integration Reimbi will send the candidate an email with Reimbi login instructions so that their expense report can be submitted and reimbursed.
The integration supports two modes of operation:
- Classic Mode - Uses a Candidate custom field
send_to_reimbito push candidate data to Reimbi. Checking this box in Greenhouse results in the individual candidate being invited to use Reimbi. - Stage Mapping Mode - With Stage Mapping, any candidate that reaches a specified stage in Greenhouse will be invited to use Reimbi. For example, you could choose to invite all candidates that reach the "In person interview" stage in Greenhouse to use Reimbi.
Initial Setup
Configure User Permissions
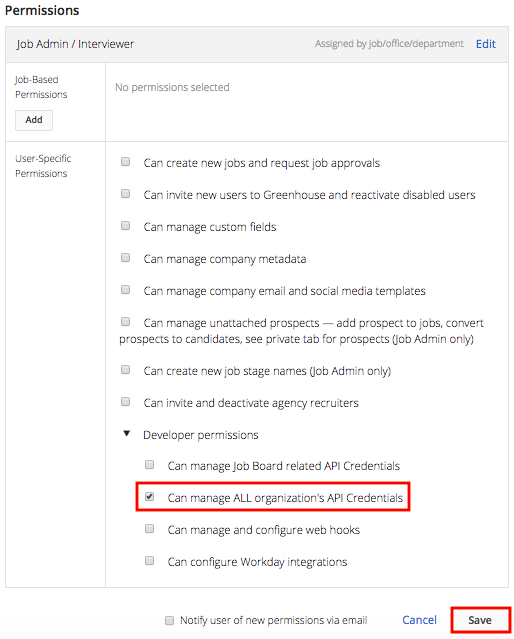
You will need the developer permission Can manage ALL organization's API Credentials in Greenhouse Recruiting.
If you don't have this permission:
- Contact your Greenhouse admin user with:
- Site Admin level permissions
- Permission to Can edit another user's advanced permissions
- Have them navigate to Configure
 > Users > Your Name

- On your user page, they should:
- Open the Permissions panel
- Expand Developer Permissions
- Select Can manage ALL organization's API Credentials
- Click Save
Configuration Steps
Step 1: Create Harvest API Key
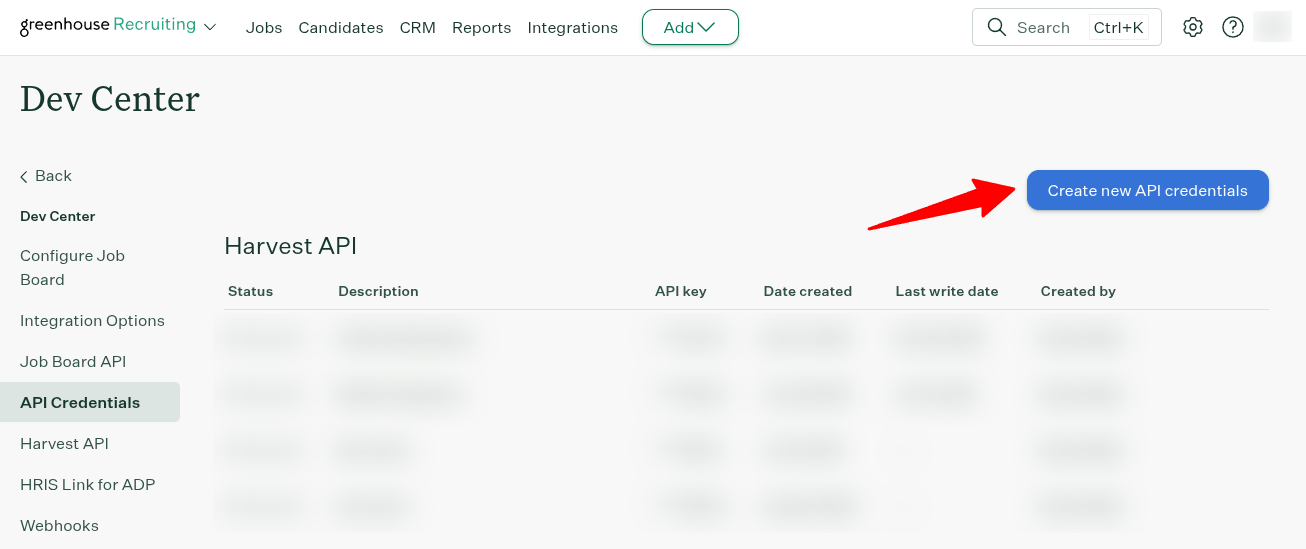
- Click the Configure icon

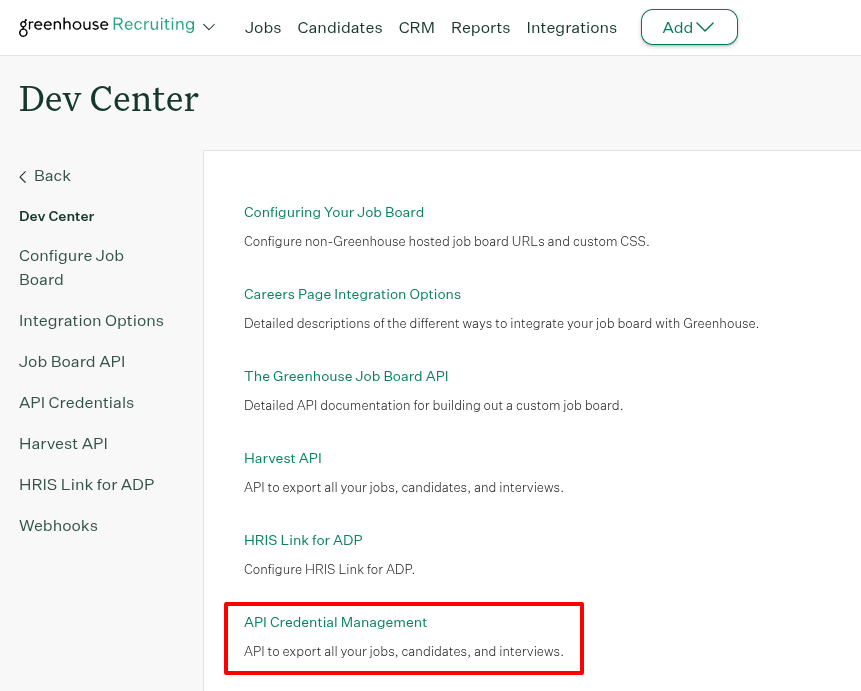
- Navigate to Dev Center > API Credential Management
- Click Create New API credentials
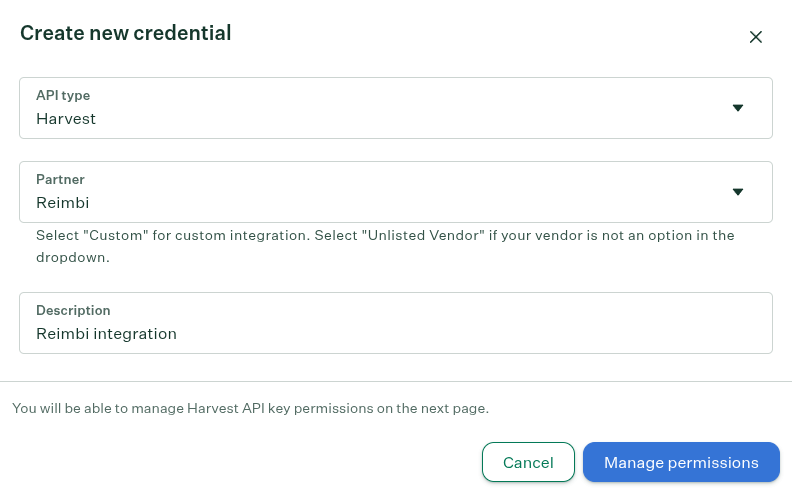
- In the Create new credential dialog:
- Select Harvest from API type dropdown
- Select Reimbi from partner dropdown
- Add description: Reimbi integration
- On the Manage API Key Permissions page, select the permissions listed below.
Candidates:
- Get: Retrieve Candidate
- Get: List Candidates
- Post: Add Note
Jobs:
- Get: Retrieve Job
- Get: List Jobs
Job Stages:
- Get: List Job Stages for Job
- Get: Retrieve Job Stage
- Get: List Job Stages
Custom Fields:
- Get: Get custom fields
Step 2: Configure Reimbi Settings
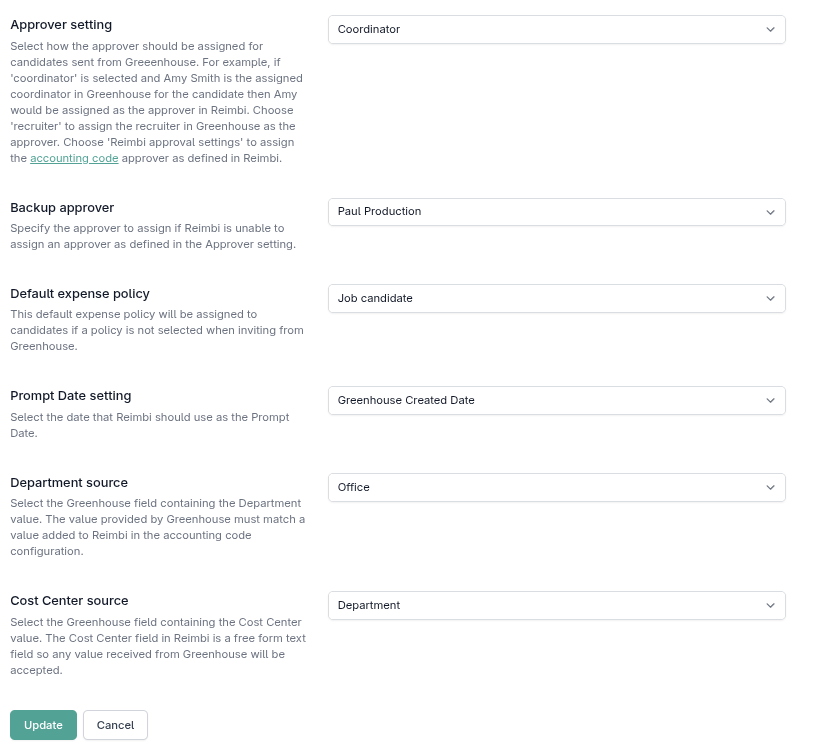
This must be done by a Reimbi user with Admin role:
- Go to Company Settings > Integrations
- Enable Greenhouse integration
- Configure:
- Enter Harvest API Key
- Choose approver role (coordinator or recruiter)
- Set backup approver
- Set default expense policy
- Click "Update"
Prompt Date Setting
The Prompt Date setting determines which date Reimbi uses as the Prompt Date for candidates sent from Greenhouse:
Available Options:
- Greenhouse Created Date - Uses the date when the candidate record was originally created in Greenhouse (
created_at) - Reimbi Created Date - Uses the date when Reimbi received the webhook and created the candidate record (
payload_date)
Note: This setting only applies when the assigned expense policy has "Display Prompt Date" enabled.
Accounting Code Source Configuration
You can configure how Reimbi populates accounting codes from Greenhouse data. These fields have configurable labels (such as "Department", "Cost Center", etc.) that can be customized in your Reimbi company settings.
Available Source Options for each accounting code field:
- Office - Uses the Office field from Greenhouse
- Department - Uses the Department field from Greenhouse
- Job Custom Field - Uses a custom field value from the Greenhouse Job
Configuration Steps:
In Company Settings > Integrations, locate the Greenhouse integration settings
For each accounting code field (with its configured label, e.g., "Department", "Cost Center"), select the source:
- Choose Office, Department, or Job Custom Field from the dropdown
If Job Custom Field is selected:
- A dropdown will appear showing available Job custom fields from Greenhouse
- Select the custom field that contains the accounting code value
- Custom fields are automatically fetched from Greenhouse using your Harvest API key
Important Notes:
The fields configured in Greenhouse must align with the corresponding fields in Reimbi's accounting code setup.
The Department field must provide values that match those configured in Reimbi's Accounting codes dropdown list.
The Cost Center field in Reimbi is a freeform text field, so any value sent from Greenhouse will be accepted.
You can review the labels configured for your organization at https://app.reimbi.com/users/~bill-to-values/. This page displays the labels defined for both the Accounting codes dropdown list (e.g., Department) and the freeform text field (e.g., Cost Center), ensuring that Greenhouse and Reimbi field mappings align correctly. Please note that these labels may vary between organizations, as they are defined by staff users within each company.
When using Job Custom Field, the value is read from the Job record associated with the candidate
If the API key lacks required permissions, you'll see an error message with instructions to update permissions
Custom fields are fetched from Greenhouse's Harvest API when you select "Job Custom Field"
Step 3: Get Reimbi Credentials
Retrieve from Reimbi:
- Login as company admin
- Navigate to Company Settings > Integrations
- Click "Generate Web Hook Secret Key and API URL"
- Copy:
- Endpoint URL
- Secret Key
Step 4: Configure Greenhouse Webhook
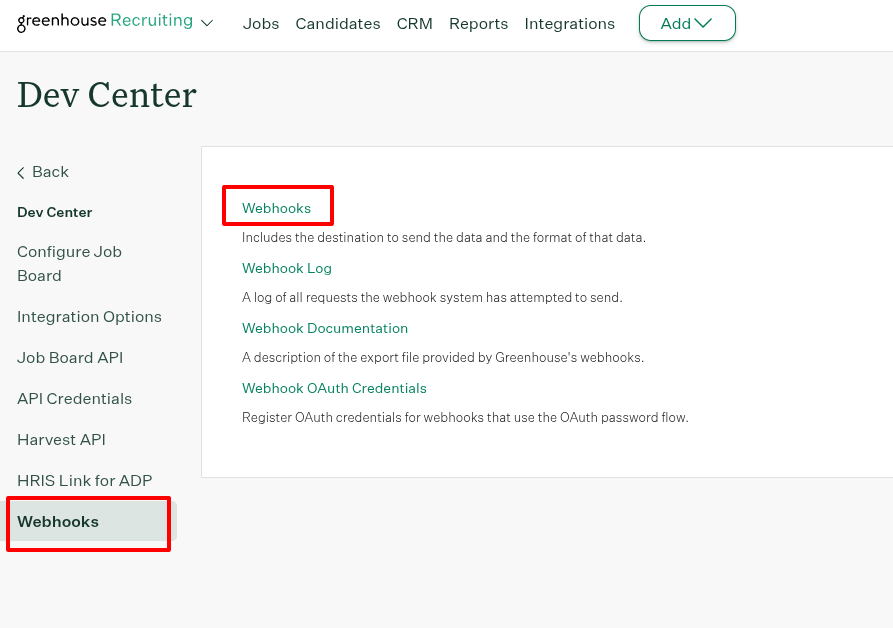
The webhook configuration depends on your chosen integration mode:
For Classic Mode:
- Navigate to Configure
 > Dev Center > Web Hooks
 - Create New Web Hook with:
- Name: Reimbi Integration
- When: Candidate or Prospect updated
- Endpoint URL: From Reimbi
- Secret Key: From Reimbi
- Error recipient email: the email address that will receive error notifications for the integration
- Associated Partner: Reimbi
- Deactivated?: No
- Click Create Webhook
For Stage Mapping Mode:
- Navigate to Configure
 > Dev Center > Web Hooks
 - Create New Web Hook with:
- Name: Reimbi Stage Integration
- When: Candidate has changed stage
- Endpoint URL: From Reimbi
- Secret Key: From Reimbi
- Error recipient email: the email address that will receive error notifications for the integration
- Associated Partner: Reimbi
- Deactivated?: No
- Click Create Webhook
For Both Modes:
You can run both modes simultaneously by creating both webhooks above.
Step 5: Configure Custom Fields
For Classic Mode:
Required for multiple reimbursement policies:
- Go to https://app.greenhouse.io/custom_fields/candidates
- Click + Add Field
- Configure:
- Name: Reimbi Reimbursement Policy
- Type: Single Select
- Options: Add your policy names (must match Reimbi exactly)
- Click Save
Required for candidate selection:
- Go to https://app.greenhouse.io/custom_fields/candidates
- Click + Add Field
- Configure:
- Name: Send to Reimbi
- Type: Yes/No
- Click Save
For Stage Mapping Mode:
Required for job filtering:
- Go to https://app.greenhouse.io/custom_fields/jobs
- Click + Add Field
- Configure:
- Name: Sync with Reimbi
- Type: Yes/No
- Click Save
Using the Integration
Classic Mode
- Open candidate's Details tab in Greenhouse
- Select reimbursement policy and Save (if using multiple policies)
- Set Send to Reimbi to Yes and Save
Stage Mapping Mode
Configure Jobs:
- Open job settings in Greenhouse
- Set Sync with Reimbi to Yes for jobs that should integrate
- Save changes
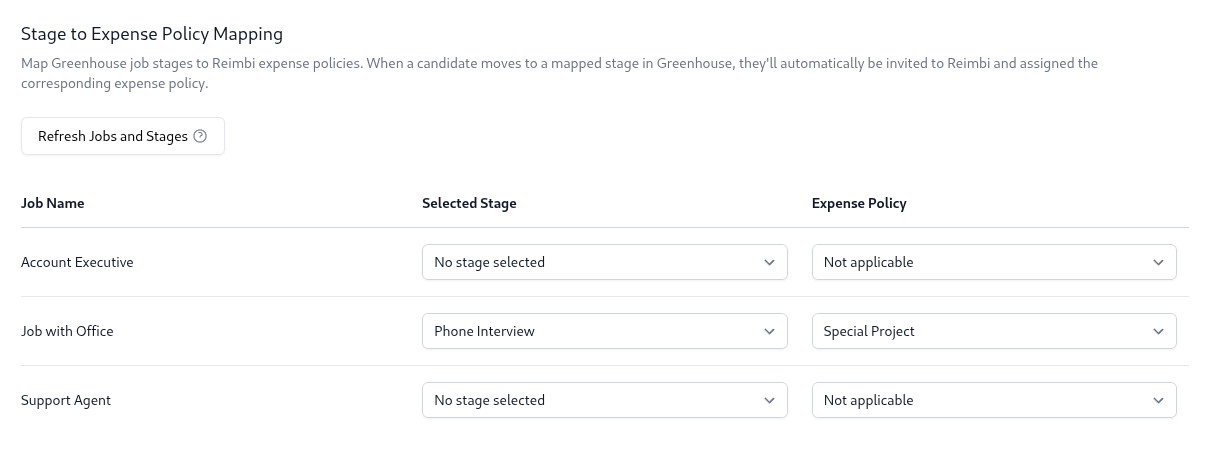
Configure Stage Mappings in Reimbi:
- Go to Company Settings > Integrations > Stage to Expense Policy Mapping
- For each job, select the trigger stage and expense policy
- Settings auto-save after 2 seconds
- Automatic Processing:
- When candidates reach the mapped stage, they're automatically sent to Reimbi
- No manual field changes required
What Happens Next
When a candidate is sent to Reimbi (via either mode):
Candidate record appears in Reimbi:
- Status: 'Invitation Pending'
- Assigned to selected policy
Candidate receives email with:
- Reimbi account setup instructions
- Expense submission guidelines
Activity note added to Greenhouse:
- "{Candidate Name} invited to use Reimbi for interview expense reimbursement"
- Visible in candidate's activity feed
Payment Notifications
When expense reports are paid:
Automatic activity note added to Greenhouse:
- "Candidate reimbursed {amount} {currency} via {payment method} for interview expenses"
- Example: "Candidate reimbursed 150.75 USD via PayPal for interview expenses"
Full reimbursement visibility in candidate timeline
Integration Modes Comparison
| Feature | Classic Mode | Stage Mapping Mode |
|---|---|---|
| Setup Complexity | Simple | Moderate |
| Control Level | Manual per candidate | Automatic per stage |
| Job Filtering | No | Yes (sync_with_reimbi) |
| Scalability | Manual effort required | Fully automated |
| Use Case | Ad-hoc invitations | Systematic process integration |
When to Use Classic Mode
- Selective candidate invitations
- Manual control preferred
- Simple setup requirements
- Existing custom field workflows
When to Use Stage Mapping Mode
- Systematic candidate processing
- Automated workflow integration
- Job-specific expense policies
- High volume candidate processing
Support
Need assistance? Contact support@reimbi.com for integration troubleshooting help.
