Applicant Tracking System (ATS)
Greenhouse Integration Setup
The Reimbi–Greenhouse integration sends candidate data from Greenhouse to Reimbi, which creates a matching candidate record in Reimbi. Once the candidate record is created, Reimbi emails the candidate with login instructions so they can submit their expenses and get reimbursed.
The integration runs in either of two modes:
- Classic Mode — uses a candidate custom field,
send_to_reimbi, to push candidate data to Reimbi. Checking this box in Greenhouse invites that individual candidate to use Reimbi. - Stage Mapping Mode — invites any candidate who reaches a chosen stage in Greenhouse. For example, you can invite every candidate who reaches the "In person interview" stage.
Authentication has moved to OAuth. Reimbi now connects to Greenhouse's Harvest API through a secure OAuth connection — there is no Harvest API key to create or paste. You simply click Connect with Greenhouse in Reimbi and authorize the integration. Greenhouse is retiring the older Harvest API versions in August 2026, so any organization still using an API key should reconnect via OAuth before then. See Step 1: Connect Reimbi to Greenhouse.
Initial Setup
Configure User Permissions
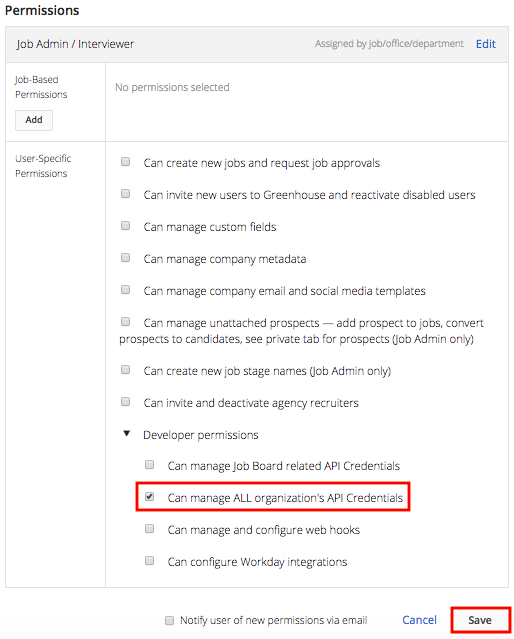
To authorize the Reimbi integration (the OAuth Connect step), you need the developer permission Can manage ALL organization's API Credentials in Greenhouse Recruiting.
If you don't have this permission, ask a Greenhouse admin to grant it:
- Find a Greenhouse admin user who has:
- Site Admin level permissions, and
- the Can edit another user's advanced permissions permission.
- Ask them to go to Configure
 > Users > Your Name.

- On your user page, they should:
- open the Permissions panel,
- expand Developer Permissions,
- select Can manage ALL organization's API Credentials, and
- click Save.
Configuration Steps
Follow these steps in order. Steps 1–3 are the same for everyone; Steps 4 and 5 depend on your integration mode, which is explained in Step 4.
Step 1: Connect Reimbi to Greenhouse
Reimbi connects to Greenhouse through a secure OAuth connection. You don't create a Harvest API key or pick any permissions — Reimbi requests exactly the access it needs during the authorization step.
This step is performed by a Reimbi user with the Admin role who is also signed in to Greenhouse with permission to authorize the integration (see Configure User Permissions).
- In Reimbi, go to Company Settings > Integrations.
- Enable the Greenhouse integration.
- Click Connect with Greenhouse.
- You're redirected to Greenhouse. Review the access Reimbi is requesting and click Authorize.
- Greenhouse sends you back to Reimbi, and the integration now shows Connected.
Good to know:
- The access Reimbi requests covers reading candidates, jobs, job stages, offices, departments, custom fields, and applications, plus posting activity notes — exactly what the integration needs to operate.
- The connection is kept alive automatically. If it ever expires or is revoked, Reimbi shows a Reconnect to Greenhouse prompt — click it and re-authorize to restore the integration.
- You can end the connection at any time with the Disconnect button on the same settings page.
Migrating from an API key
If your organization was set up before OAuth support, you may still have a Harvest API key on file. Both methods keep working during the transition, but Greenhouse is deprecating the older Harvest API in August 2026. Click Connect with Greenhouse to switch to OAuth before that date — nothing else changes, and your existing settings (approver, policies, and webhooks) are preserved.
Step 2: Configure Reimbi Settings
This step is performed by a Reimbi user with the Admin role:
- Go to Company Settings > Integrations.
- Enable the Greenhouse integration, and connect it (see Step 1).
- Configure the following:
- Choose the approver role (coordinator or recruiter).
- Set the backup approver.
- Set the default expense policy.
- Click Update.
Prompt Date Setting
The Prompt Date setting controls which date Reimbi uses as the Prompt Date for candidates sent from Greenhouse:
- Greenhouse Created Date — the date the candidate record was originally created in Greenhouse (
created_at). - Reimbi Created Date — the date Reimbi received the webhook and created the candidate record (
payload_date).
Note: this setting only applies when the assigned expense policy has "Display Prompt Date" enabled.
Accounting Code Source Configuration
You can control how Reimbi populates accounting codes from Greenhouse data. These fields have configurable labels (such as "Department" or "Cost Center") that you can customize in your Reimbi company settings.
Each accounting code field can draw its value from one of these sources:
- Office — uses the Office field from Greenhouse.
- Department — uses the Department field from Greenhouse.
- Job Custom Field — uses a custom field value from the Greenhouse Job.
To configure them:
- In Company Settings > Integrations, find the Greenhouse integration settings.
- For each accounting code field (shown with its configured label, e.g., "Department" or "Cost Center"), select the source — Office, Department, or Job Custom Field — from the dropdown.
- If you choose Job Custom Field:
- A dropdown appears listing the Job custom fields available from Greenhouse.
- Select the custom field that holds the accounting code value.
- Custom fields are fetched automatically from Greenhouse using your connection.
Important notes:
- The fields configured in Greenhouse must align with the corresponding fields in Reimbi's accounting code setup.
- The Department field must provide values that match those configured in Reimbi's Accounting codes dropdown list.
- The Cost Center field in Reimbi is a freeform text field, so any value sent from Greenhouse is accepted.
- You can review the labels configured for your organization at https://app.reimbi.com/users/~bill-to-values/. This page shows the labels defined for both the Accounting codes dropdown list (e.g., Department) and the freeform text field (e.g., Cost Center), helping you confirm that the Greenhouse and Reimbi field mappings line up. Note that these labels can vary between organizations, since they're defined by staff users within each company.
- When you use Job Custom Field, the value is read from the Job record associated with the candidate.
- If the Greenhouse connection is missing or has expired, you'll see a prompt to (re)connect via Connect with Greenhouse.
- Custom fields are fetched from Greenhouse's Harvest API when you select "Job Custom Field".
Step 3: Get Reimbi Credentials
Retrieve the webhook details from Reimbi:
- Log in as a company admin.
- Go to Company Settings > Integrations.
- Click Generate Web Hook Secret Key and API URL.
- Copy both values:
- the Endpoint URL, and
- the Secret Key.
Step 4: Configure Greenhouse Webhook
This is the first step that depends on your integration mode. Review the modes below, then create the webhook that matches the mode you choose.
Choosing your mode
- Classic Mode — you invite candidates one at a time by setting the
send_to_reimbifield. Best for selective, manual invitations. - Stage Mapping Mode — candidates are invited automatically when they reach a stage you've mapped to an expense policy. Best for a hands-off, higher-volume workflow.
You can also run both modes at the same time.
| Feature | Classic Mode | Stage Mapping Mode |
|---|---|---|
| Setup Complexity | Simple | Moderate |
| Control Level | Manual per candidate | Automatic per stage |
| Job Filtering | No | Yes (sync_with_reimbi) |
| Scalability | Manual effort required | Fully automated |
| Use Case | Ad-hoc invitations | Systematic process integration |
Choose Classic Mode when you want: selective candidate invitations, manual control, a simple setup, or to keep existing custom-field workflows.
Choose Stage Mapping Mode when you want: systematic candidate processing, automated workflow integration, job-specific expense policies, or high-volume candidate processing.
Create the webhook
Create the web hook that matches your mode:
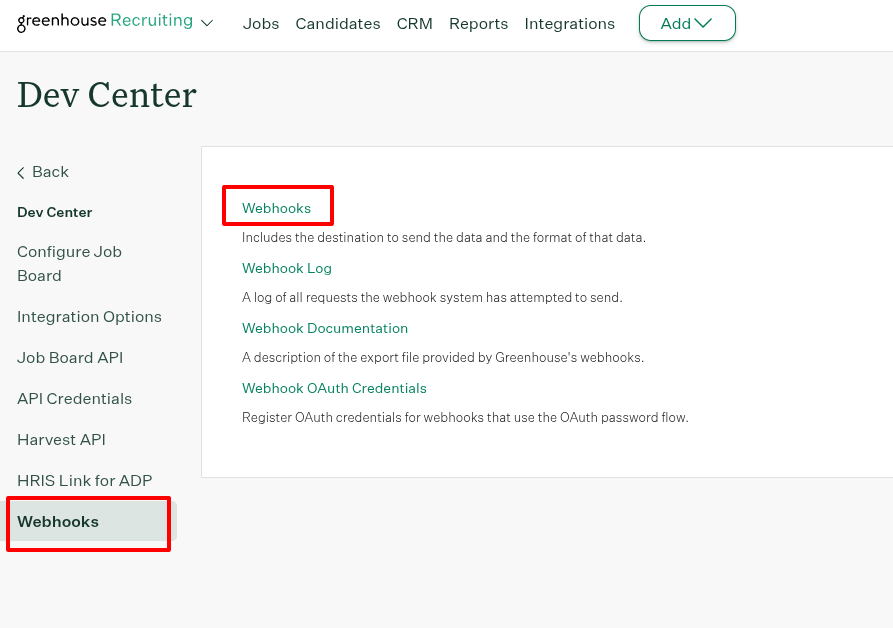
- Go to Configure > Dev Center > Web Hooks.
- Create a new web hook with:
- Name: Reimbi Integration
- When: Candidate or Prospect updated
- Endpoint URL: from Reimbi
- Secret Key: from Reimbi
- Error recipient email: the email address that should receive error notifications for the integration
- Associated Partner: Reimbi
- Deactivated?: No
- Click Create Webhook.
- Go to Configure > Dev Center > Web Hooks.
- Create a new web hook with:
- Name: Reimbi Stage Integration
- When: Candidate has changed stage
- Endpoint URL: from Reimbi
- Secret Key: from Reimbi
- Error recipient email: the email address that should receive error notifications for the integration
- Associated Partner: Reimbi
- Deactivated?: No
- Click Create Webhook.
Running both modes: you can run both at the same time by creating both web hooks above.
Step 5: Configure Custom Fields
Required for multiple reimbursement policies:
- Go to https://app.greenhouse.io/custom_fields/candidates.
- Click + Add Field.
- Configure:
- Name: Reimbi Reimbursement Policy
- Type: Single Select
- Options: add your policy names (they must match Reimbi exactly).
- Click Save.
Required for candidate selection:
- Go to https://app.greenhouse.io/custom_fields/candidates.
- Click + Add Field.
- Configure:
- Name: Send to Reimbi
- Type: Yes/No
- Click Save.
Required for job filtering:
- Go to https://app.greenhouse.io/custom_fields/jobs.
- Click + Add Field.
- Configure:
- Name: Sync with Reimbi
- Type: Yes/No
- Click Save.
Using the Integration
- Open the candidate's Details tab in Greenhouse.
- Select the reimbursement policy and click Save (only needed if you use multiple policies).
- Set Send to Reimbi to Yes and click Save.
Configure jobs:
- Open the job settings in Greenhouse.
- Set Sync with Reimbi to Yes for the jobs that should integrate.
- Save your changes.
Configure stage mappings in Reimbi:
- Go to Company Settings > Integrations > Stage to Expense Policy Mapping.
- For each job, select the trigger stage and the expense policy.
- Settings auto-save after 2 seconds.
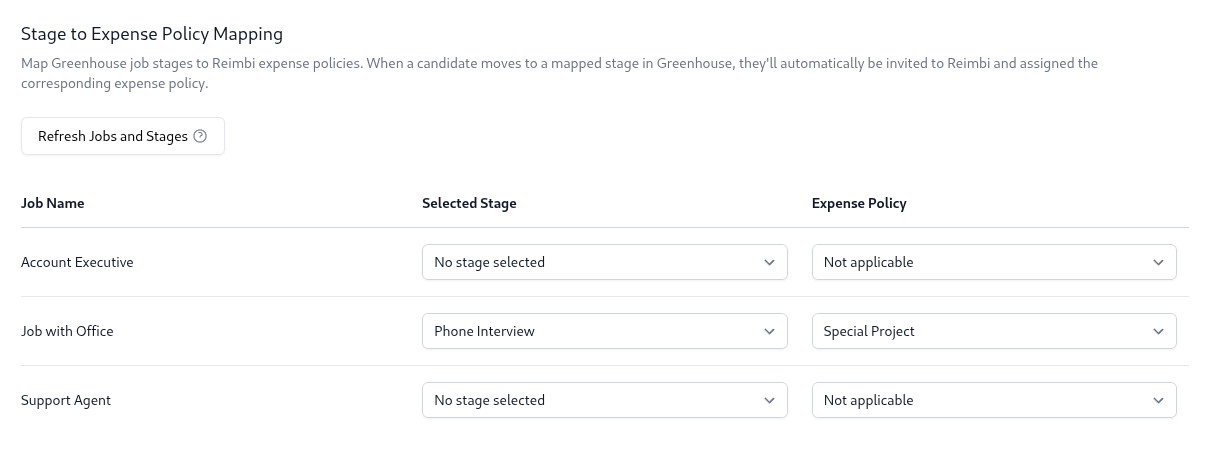
- Automatic processing:
- When candidates reach the mapped stage, they're sent to Reimbi automatically.
- No manual field changes are required.
What Happens Next
When a candidate is sent to Reimbi (in either mode):
A candidate record appears in Reimbi:
- Status: 'Invitation Pending'
- Assigned to the selected policy
The candidate receives an email with:
- Reimbi account setup instructions
- Expense submission guidelines
An activity note is added to Greenhouse:
- "{Candidate Name} invited to use Reimbi for interview expense reimbursement"
- Visible in the candidate's activity feed
Payment Notifications
When an expense report is paid:
An activity note is added to Greenhouse automatically:
- "Candidate reimbursed {amount} {currency} via {payment method} for interview expenses"
- Example: "Candidate reimbursed 150.75 USD via PayPal for interview expenses"
Full reimbursement history is visible in the candidate's timeline.
Support
Need help? Contact support@reimbi.com for integration troubleshooting.